Drawing a girl’s face can seem a bit challenging, but with the right guide, it becomes easy. In this tutorial, you’ll learn how to draw a girl’s face with simple steps, focusing on basic shape and detail. By observing the natural structure, you’ll start to understand the placement of key elements like the eyes, nose, and mouth.
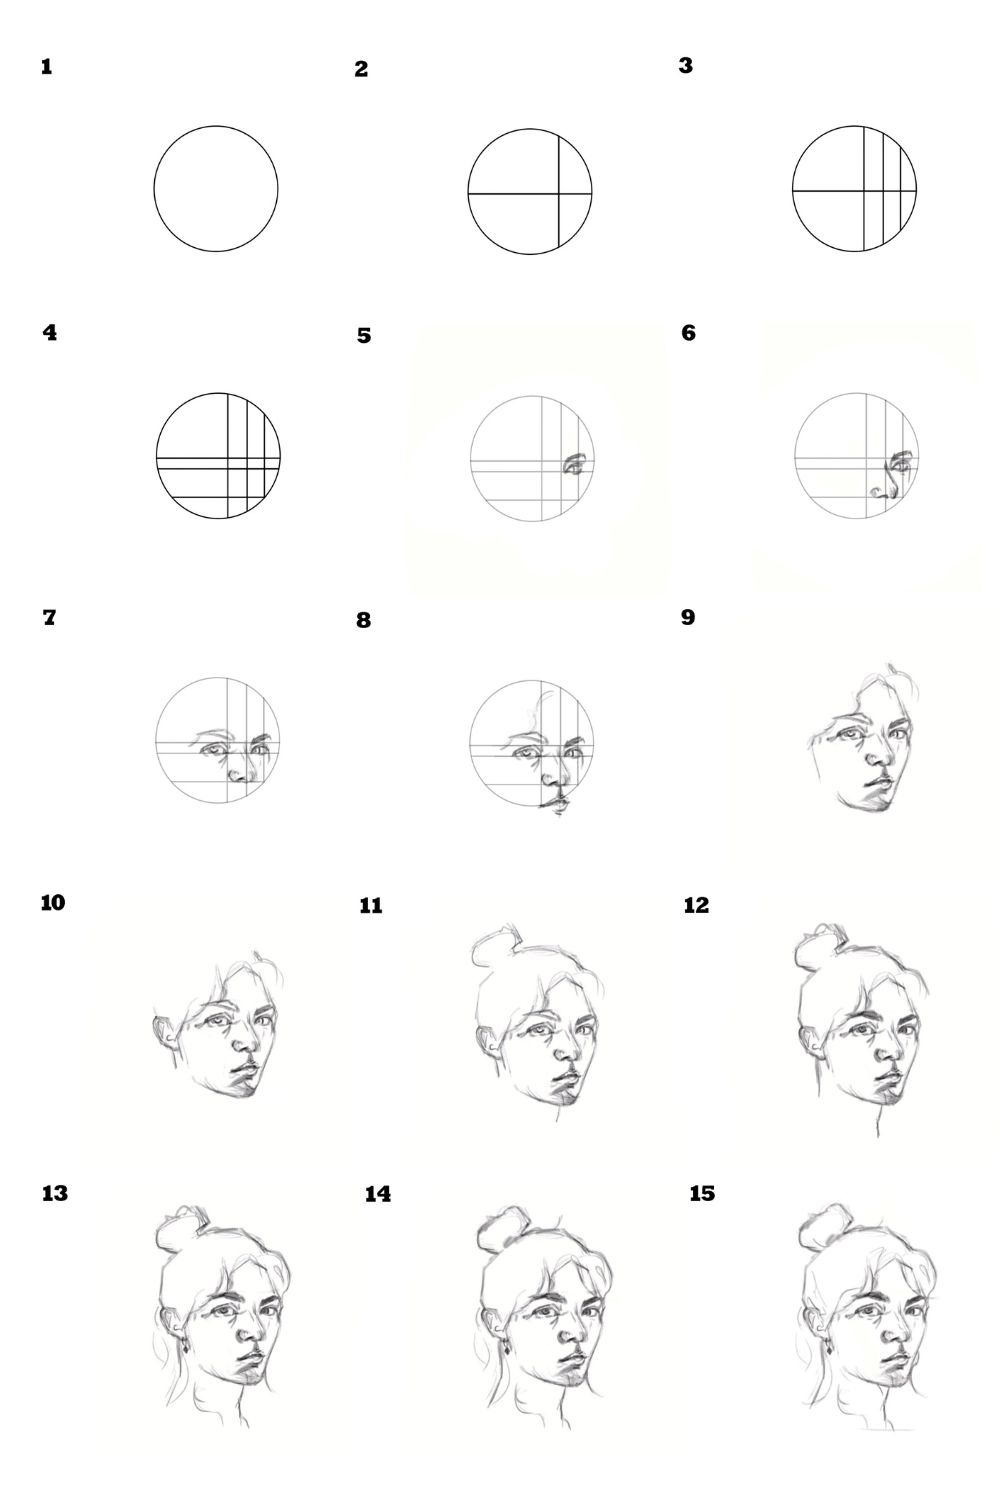
Pay attention to the shape of the head, the positioning of the facial features and the details that add emotion to a face. This guide is designed to be simple, offering you an easy approach to sketching a girl’s face easily and realistically. Whether you’re a beginner or have some experience, following these steps will help you achieve a balanced, well-structured drawing. Let’s explore how to draw a face that has a look of a girl’s expression in a few guided steps.
Let’s start
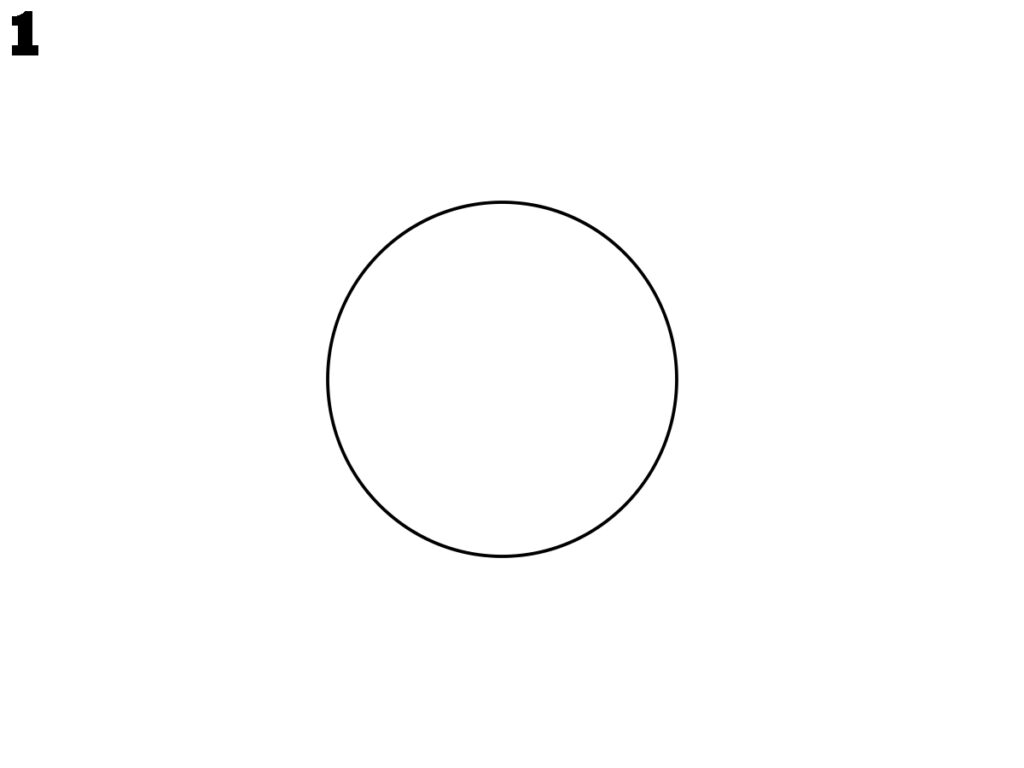
Step 1: In this first step, start by drawing a simple circle to form the basic shape of the head. keep the circle smooth and round, which will serve as the base for the rest of the drawing. This outline helps to establish the proportions and placement of the facial features. Keep your lines light and easy to erase for adjustments in the upcoming steps.
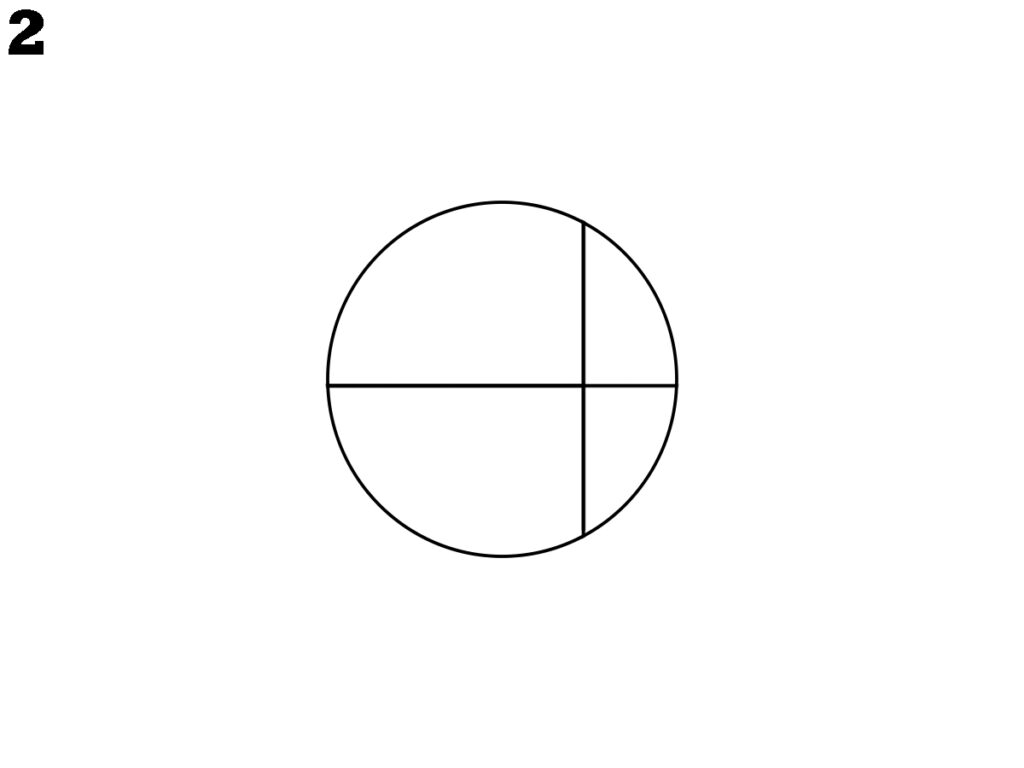
Step 2: In this second step, draw two intersecting lines within the circle to help place the facial features accurately. The horizontal line should divide the circle in half, representing the eye line, while the vertical line should run through the centre, marking the symmetry of the face. These guidelines will assist in aligning the eyes, nose, and mouth properly as you continue with the drawing. Keep the lines light to allow for easy adjustments.
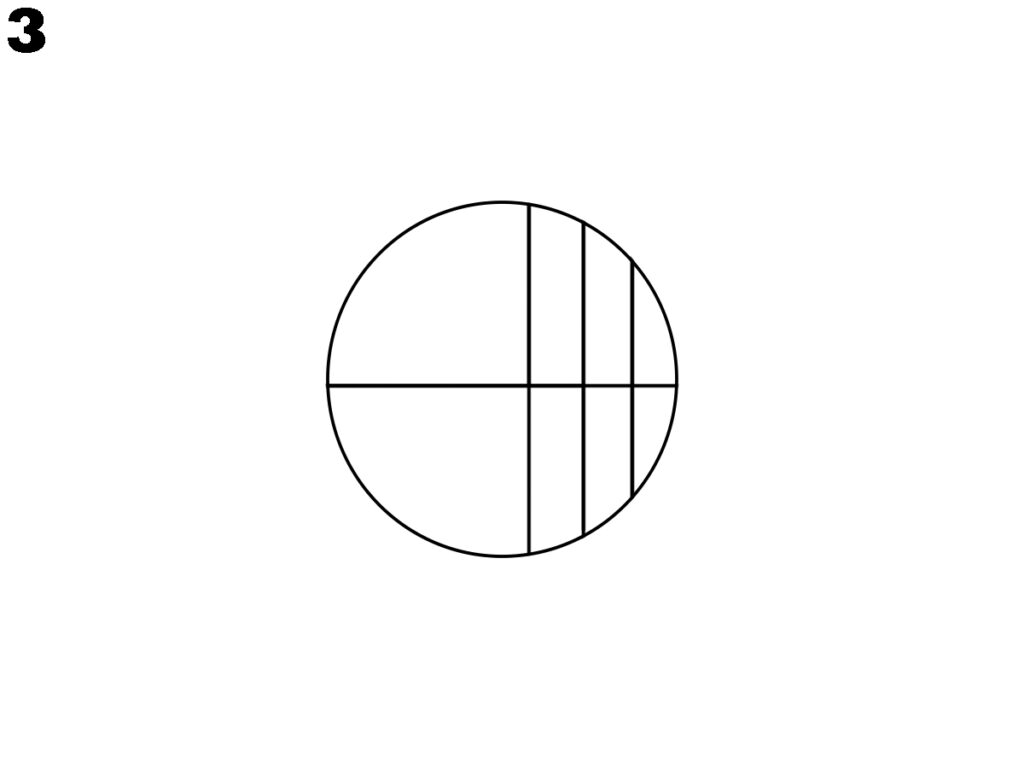
step 3: In the third step, draw three vertical lines on the right side of the circle to help place the facial features. These lines guide the width of the eyes, nose, and mouth. Place the first line near the central vertical line, the second a bit to the right, and the third even further right. Keep these lines light for easy adjustments, ensuring proper proportions as you develop the face.
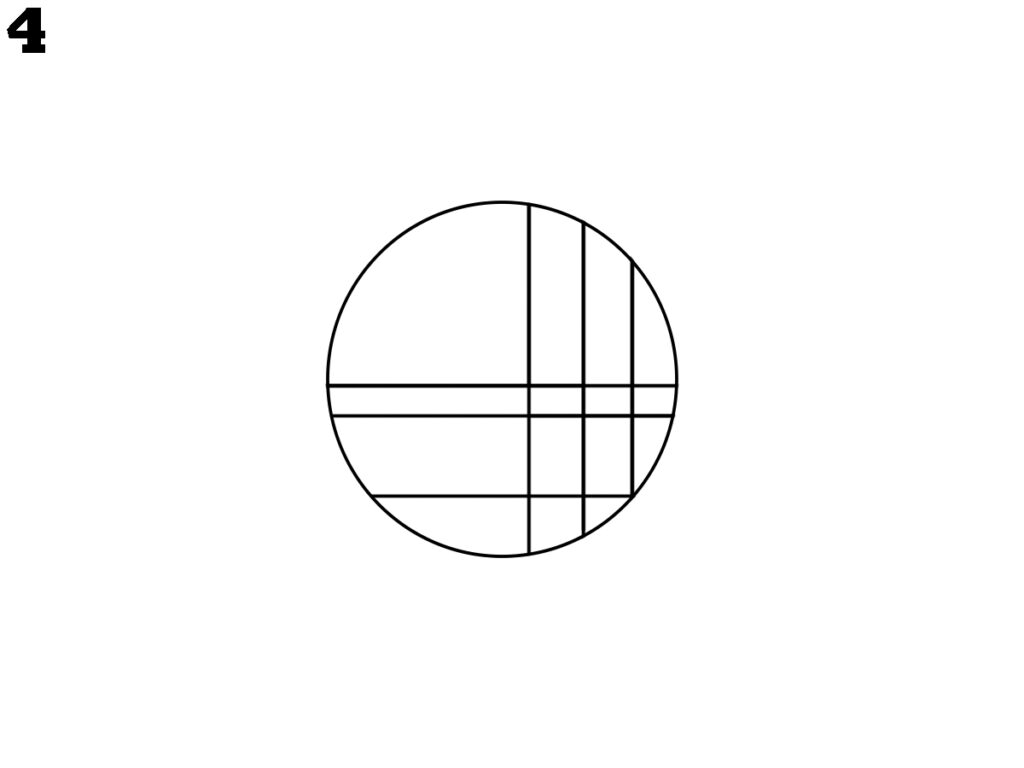
step 4: In the fourth step, add two more vertical lines to refine the guidelines for the facial features. Place the first line above the centre circle to mark the top of the eyes. Align the second line with the centre horizontal line for nose level. Draw the third line below the centre line to indicate the bottom of the nose. These guides will help you position the eyes, nose, and mouth accurately.
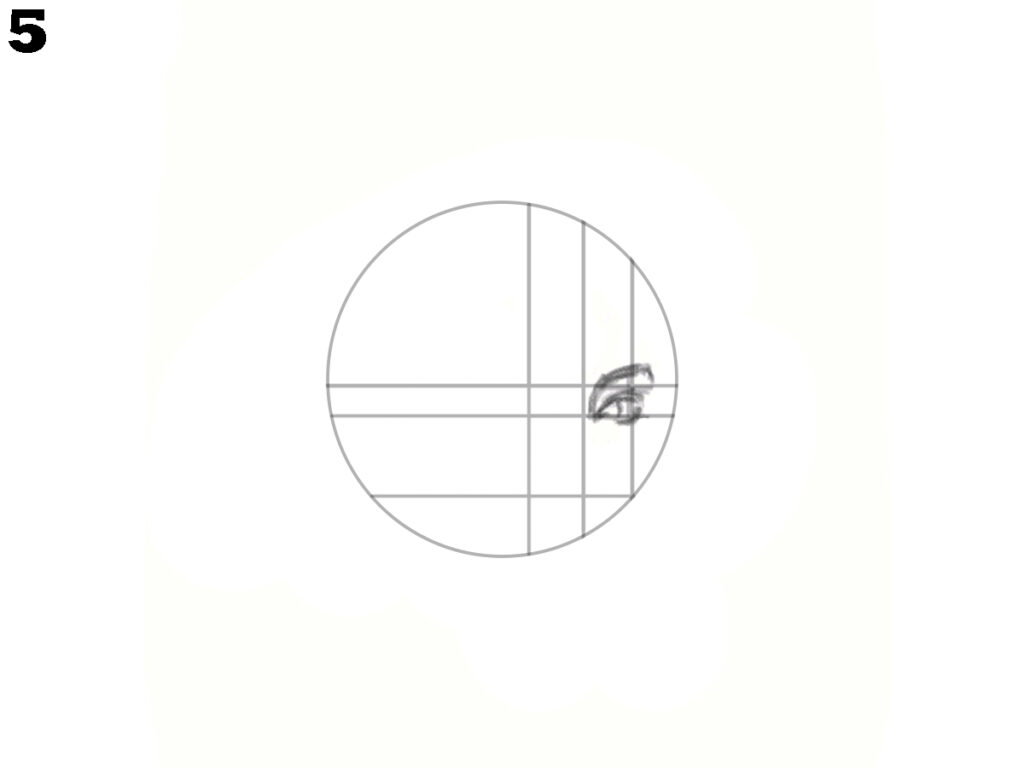
step 5: In the fifth step, start drawing the eyes. Using the guidelines, sketch one eye on the right side of the circle. The top of the eye should align with the top horizontal guideline, and the bottom of the eye should align with the centre horizontal guideline. Add the eyebrow above the eye, following the curve of the head. This step focuses on detailing the eye and eyebrow.
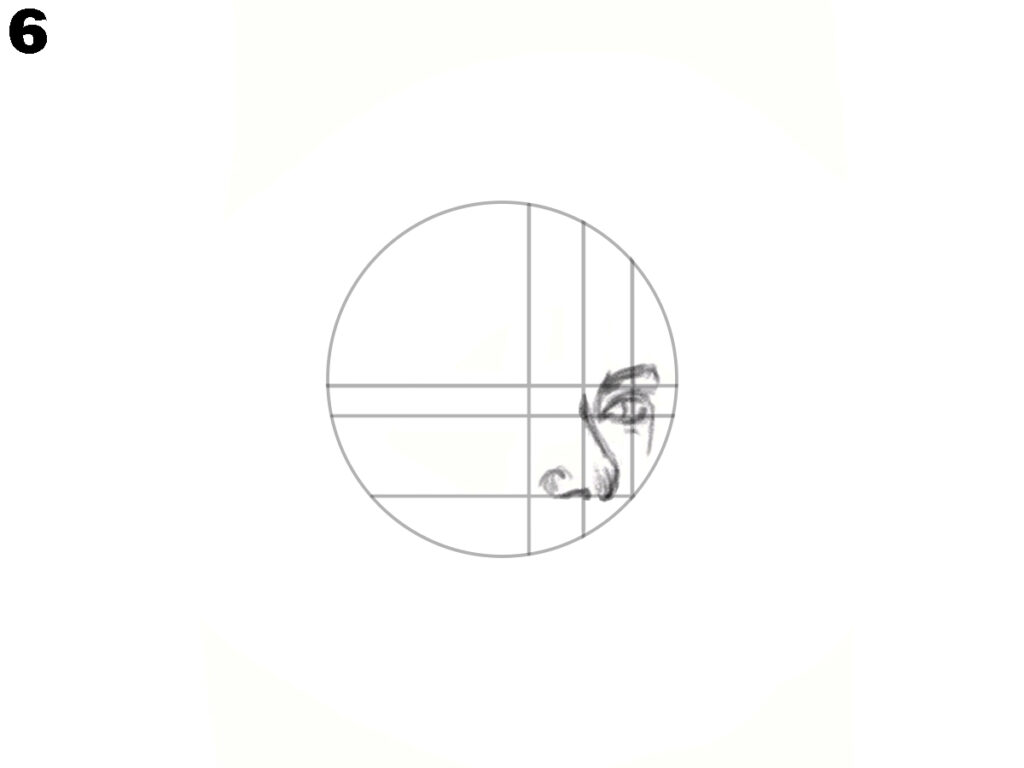
step 6: In the sixth step, start shaping the nose. Using the guidelines, draw the nose below the eye, centred along the vertical guideline. The nose should be small and rounded. Extend a line down from the bottom of the nose to create the mouth, curving slightly to the left. This step adds key facial features, helping to define the facial expression.
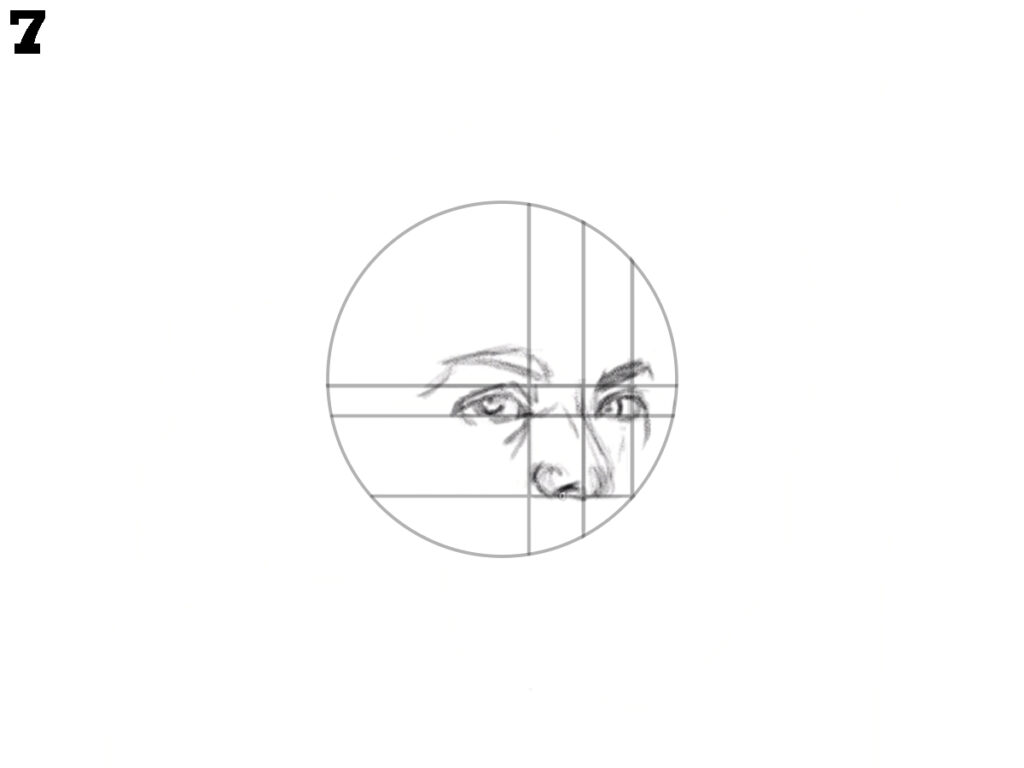
step 7: In the seventh step, refine the eyes, and nose, and add the eyebrows. Detail the eyes, ensuring symmetry and adding pupils and irises for definition. Enhance the nose, adding nostrils and shading for depth. Draw the eyebrows above the eyes, following the brow bone’s curve. The eyebrows should be thick and expressive, adding character to the face. This step enhances the facial features, bringing the drawing to life.
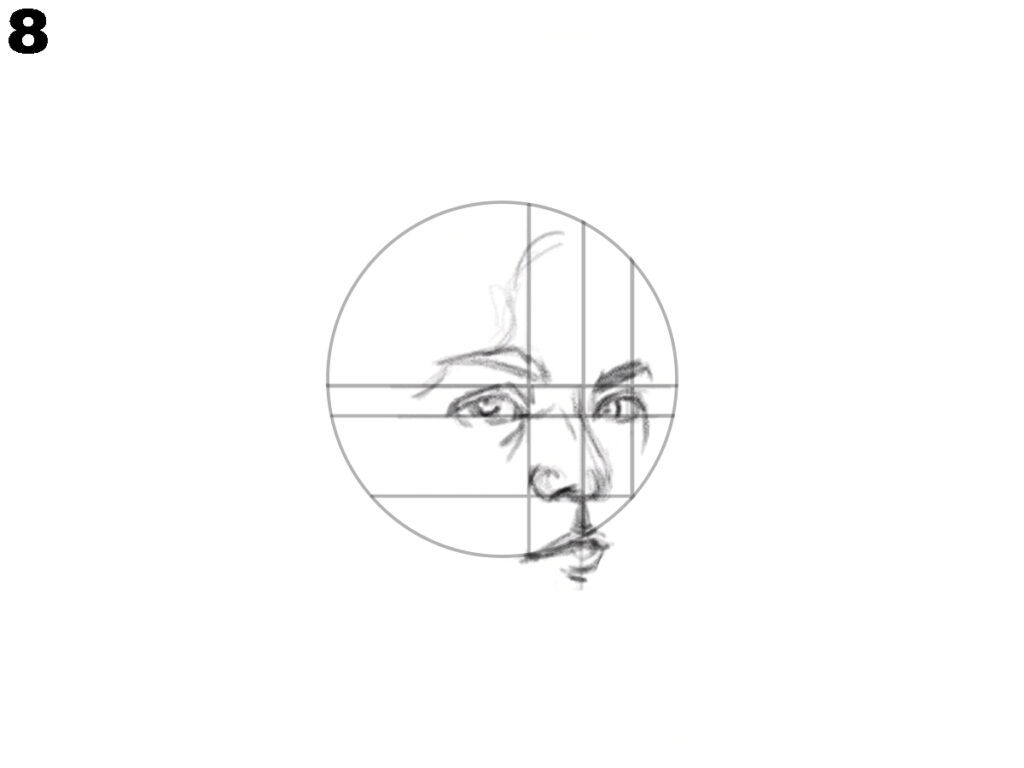
step 8: In the eighth step, define the mouth and add facial details. Start by sketching the mouth, and positioning it with guidelines. Draw the upper and lower lips with a natural curve. Add slight shading around the mouth for depth. Refine other facial features, like the bridge of the nose and forehead lines. This step enhances realism and expression, ensuring all features are proportionate and detailed.
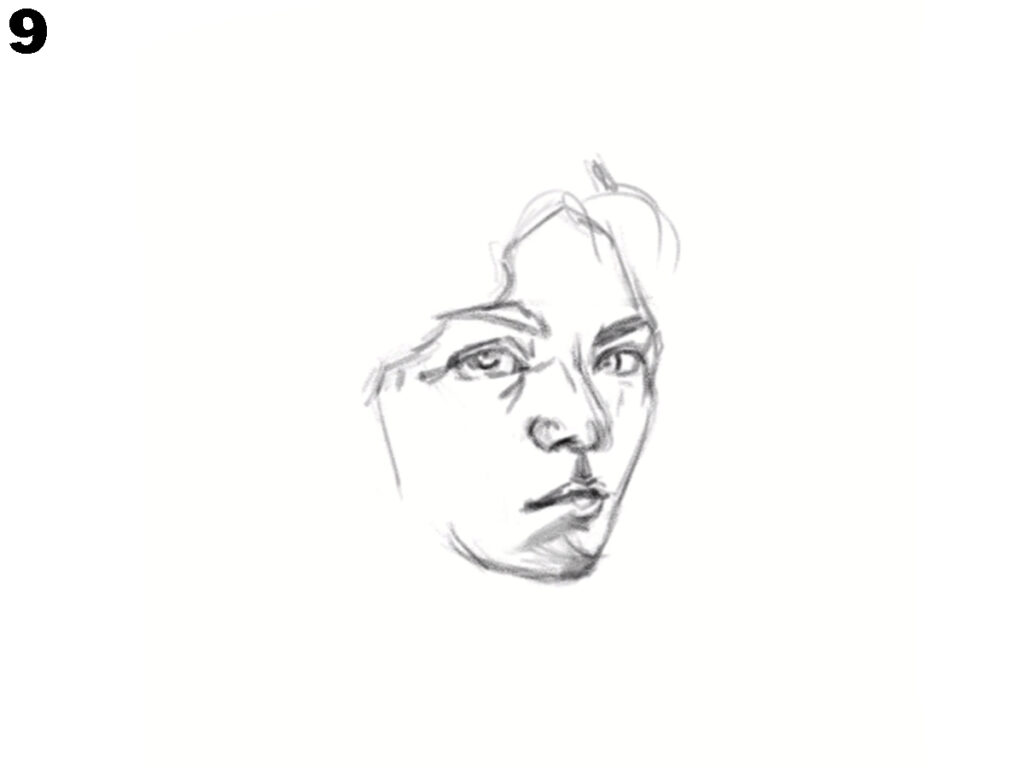
step 9: In the ninth step, define the hair and enhance facial details. Sketch the hair outline, giving it volume and flow with light, swift strokes for a natural texture. Refine the face by adding depth with shadows and highlights, focusing on the cheekbones, nose, and around the eyes. Emphasize the facial contours to make the features more prominent. This step adds dimension and realism, making the face real and expressive.
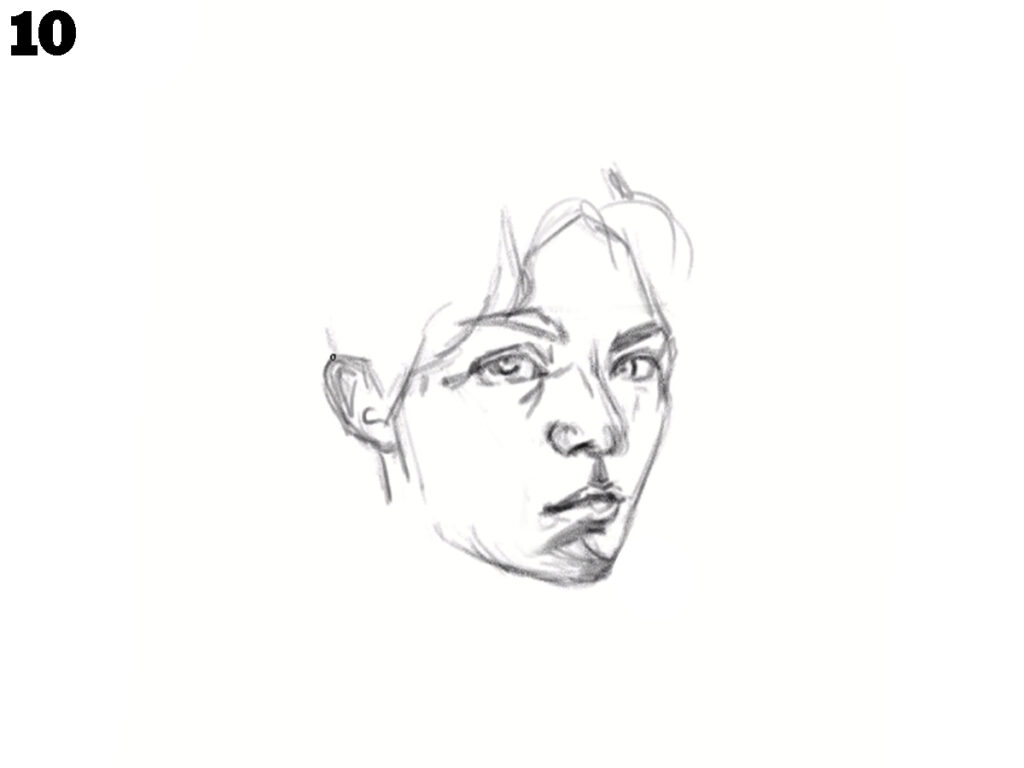
step 10: In the tenth step, add more details to the hair and begin defining the ear. Continue refining the hair, focusing on individual strands and natural flow. Add the ear on the side of the head, paying attention to its shape and positioning. Enhance facial features further by adding subtle shading and highlights, particularly around the eyes, nose, and lips. This step adds more depth and realism, making the portrait more expressive and lifelike.
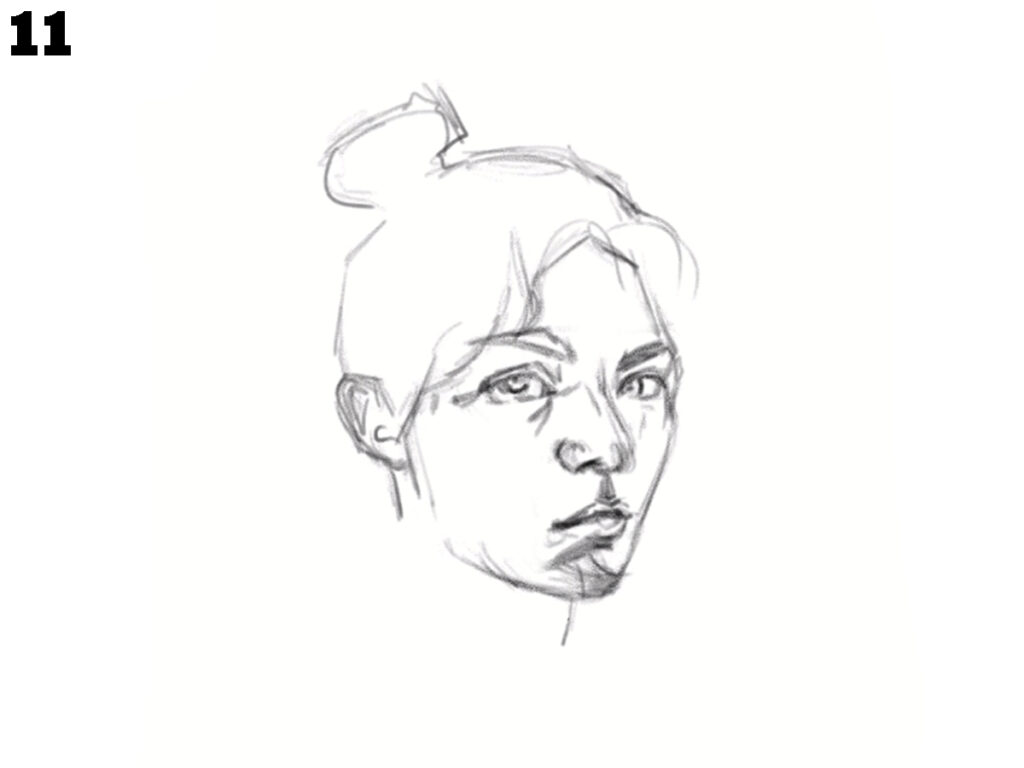
step 11: In the eleventh step, sketch the hair’s overall shape, including the bun. Define the ear with more details. Enhance facial features by adding subtle lines and shading for depth and texture. Outline the neck, ensuring its proportions match the head. Adjust the hairline for a natural transition from forehead to hair. This step solidifies the structure and brings more life to the portrait.
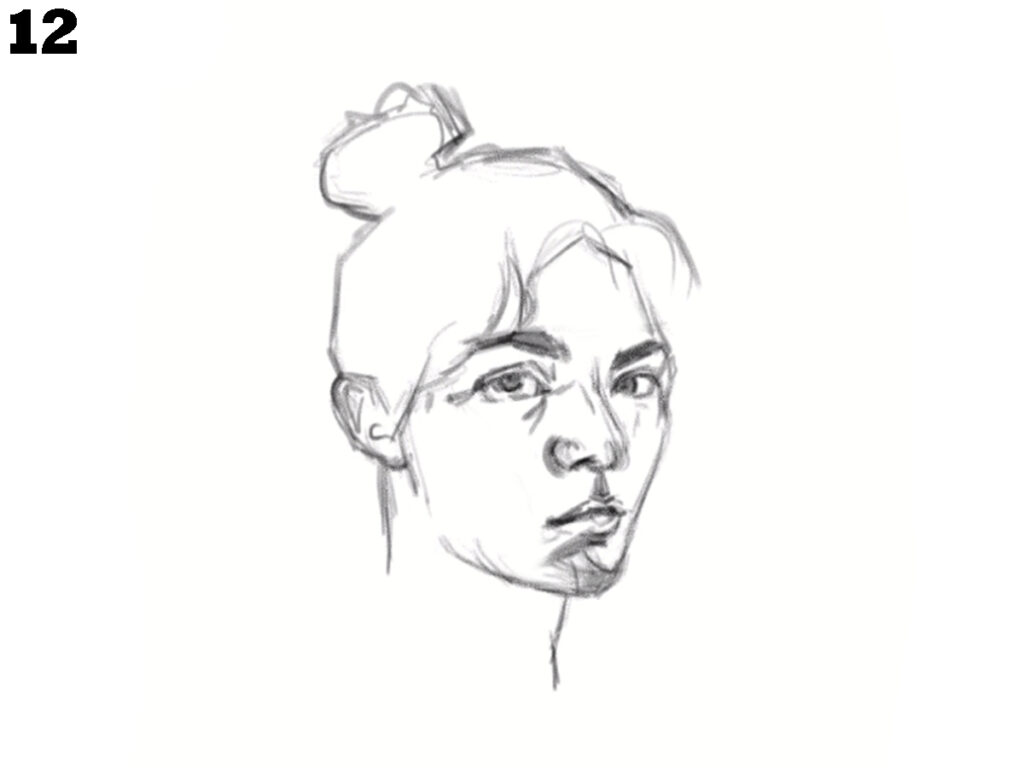
step 12: In the twelfth step, refine the head and neck shape. Add detail to the ear and hair, making the bun more defined. Deepen shading around the eyes, nose, and mouth to enhance facial features. Emphasize facial contours, focusing on the jawline and cheekbones for a three-dimensional effect. Adjust the hairline and strands for a natural look. This step solidifies the structure and adds realism to the portrait.
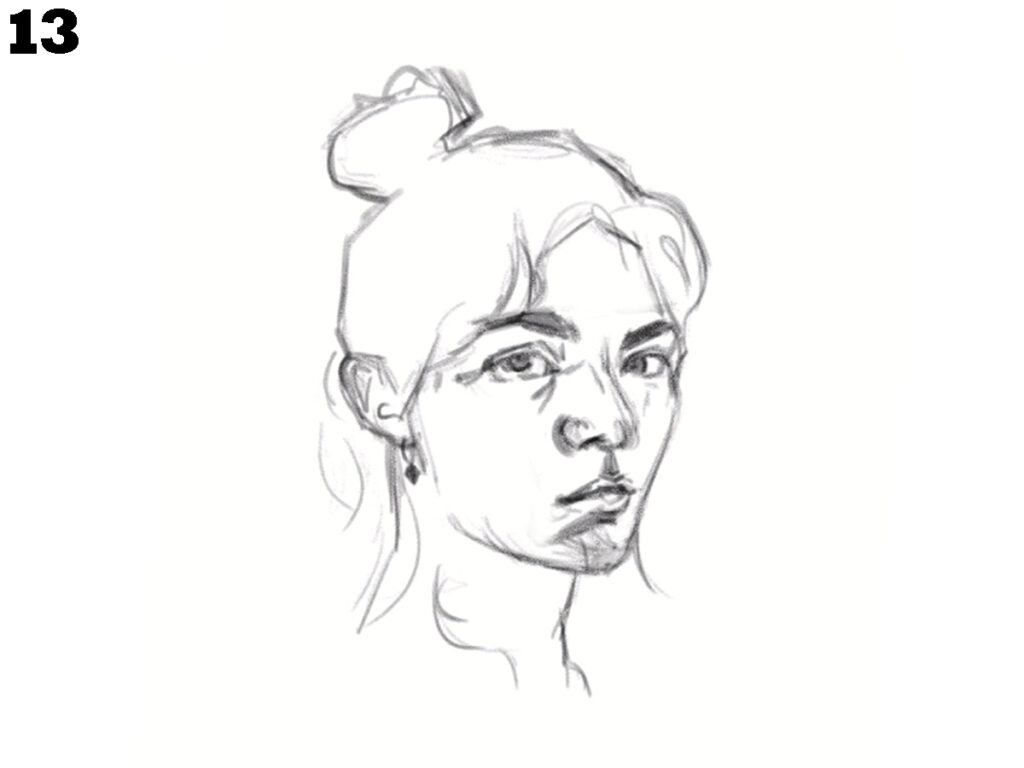
step 13: In the thirteenth step, refine the hair’s details and texture, focusing on strands around the bun and loose hairs. Enhance facial shading to add depth, emphasizing shadows and highlights. Define the ear and add details to the earring. Subtly shade the neck to suggest contours and musculature. Ensure facial features are well-proportioned, adjusting lines for accuracy. This step aims to add realism and detail to the portrait.
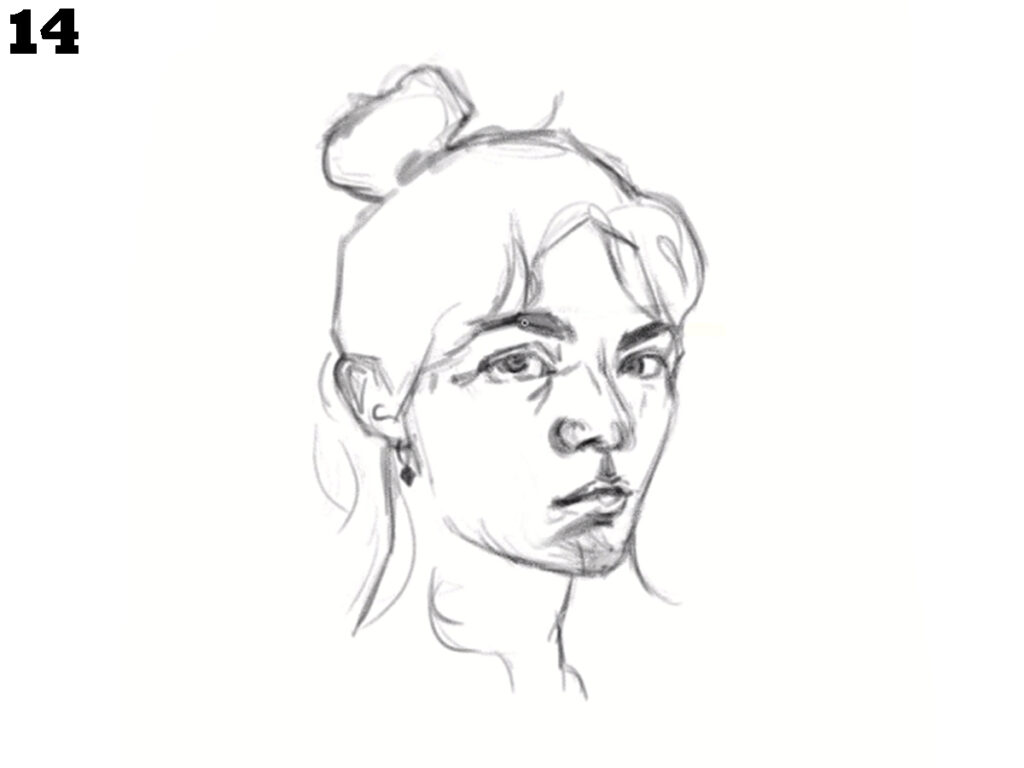
step 14: In the fourteenth step, continue refining facial features and adding depth. Focus on the eyes, enhancing the shape, eyelids, and pupils. Add texture and volume to the hair, especially around the forehead and bun. Refine the eyebrows, ensuring a natural look. Improve shading on the nose and mouth for three-dimensionality. Add subtle details to the earring and further define the neck and shoulders, enhancing the portrait’s realism and cohesion.
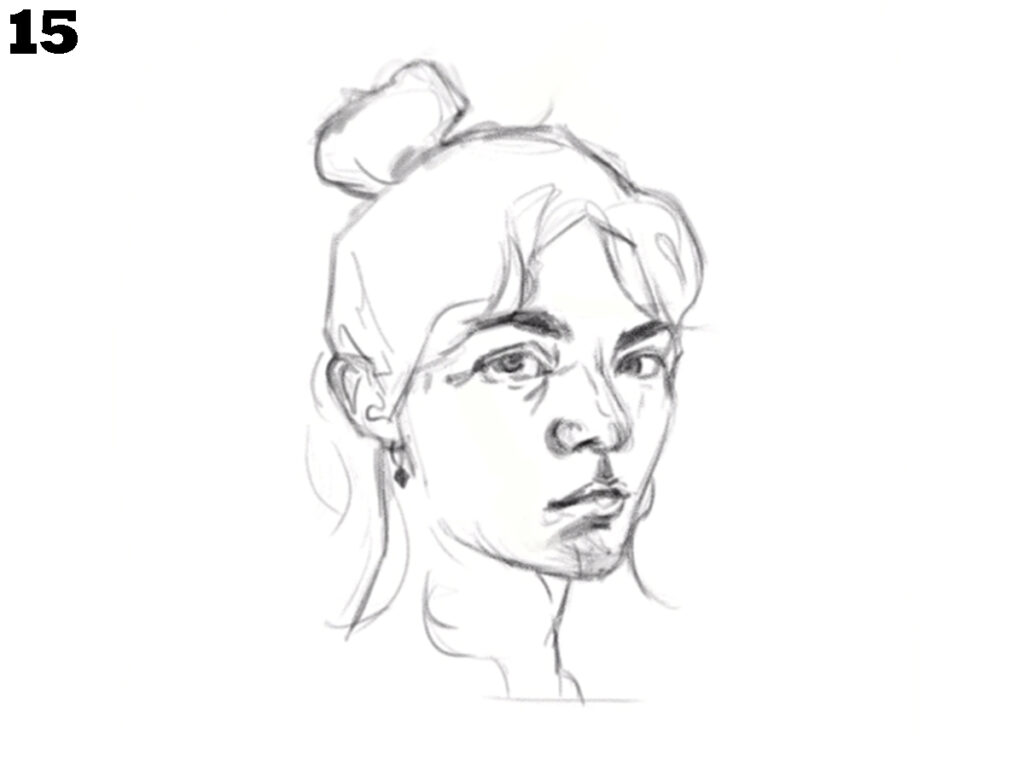
Step 15: In the fifteenth step, refine details and shading for a polished look. Smooth hair lines, define individual strands and enhance the eyes with well-defined pupils and subtle shading. Refine the nose and mouth to match the light source and add depth. Detail the face’s contours with subtle shading on the cheeks, jawline, and neck. Finish by adding highlights and shadows to the earring for a realistic metallic effect.
Conclusion
Now that you’ve followed the guide, you should have a clear and structured drawing of a girl’s face. By paying attention to each step and taking time to understand the proportions, you’ve built a solid foundation for facial drawing. Remember that practice is essential for refining these techniques; each time you draw, you’ll feel less difficult to draw. Revisiting the areas you found challenging will help you become better at creating realistic and balanced faces. This tutorial has provided you with a basic understanding of how to draw a girl’s face, and as you keep practising, you’ll be able to add your style and detail. Continue practising these steps consistently to improve and for more refined results in your future drawings.

